Volkszone Forum banner

1988 T3 Caravelle

62K views 583 replies 25 participants last post by  Zebedee 
#1 · (Edited)
Since i've pretty much run out of things to do on my bug my attention has turned to my T3 Caravelle.
Apart from some seam grot thats pretty hard to eradicate she's not in too bad a shape.
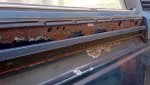
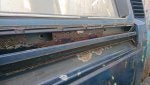
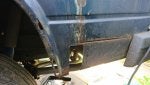
The worst bits are some rot around the filler cap surround (and probably in the B pillar behnd the tanks expansion bottle), a seam thats lost its flange on the rear corner and some holes in the lower front panel above the deformation panel.
Tire Wheel Car Automotive tire Automotive lighting
Wood Automotive exterior Gas Composite material Rectangle
Automotive tire Automotive lighting Wood Bumper Motor vehicle
Bumper Wood Automotive exterior Vehicle door Gas
 
See less See more
4
#2 · (Edited)
The rear hatch is rotten all along its bottom where the inner and outer skins meet and as a repair panel for the inner isn't available i might try and see if its possible to use a cheap sliding door inner repair and remake the outer inch.
Good second hand hatches are way out of my price range and new are hundreds and hundred of pounds.

There also a small bit of rot in the passengers side floor which i think is above the jacking point outrigger. Its not visible from underneath so i assume its just mud or sand thats got on top of the outrigger under the floor and eruped out.

I've not managed to find a good second hand 5 speed petrol gearbox to replace this one yet. Mines currently missing 5th gear, grumbles in 1st and 2nd and leaks like a sieve. Its too far gone to rebuild as i think the main bearing has pounded the case to death plus a rebuild could cost a grand or more. :eek:
Automotive parking light Automotive tail & brake light Automotive side marker light Automotive lighting Vehicle
Wood Fluid Insect Arthropod Pest
 
#3 · (Edited)
The engine has 190K on the clock and leaks like the Exxon Valdez.
I know it need a flywheel oil seal and also the one behind the pulley, plus the drain plug has an iffy thread so won't tighten up but looking around it seems to show a lot of the oil is on top of the engine too.

I removed the dizzy and found a flat dizzy shaft seal, the breather tower has an O ring under it and that was split and there was oil escaping from under the fuel pump too. The dipstick tube was also missing its O ring from its base. :rolleyes:
I put an order for all the seals and gaskets in to Brickwerks so they should be with me in a day or two.
Luckily the paper gasket at the base of the oil filler tube was still dry as it seems its impossible to get to one of the mounting nuts with the silencer, heat shield and engine bar in place.

I removed the alternator and belt so i could get the crankshaft pulley off, but even with the van in gear, the handbrake pulled on tight and all the wheels chocked it still moved when i tried to undo the pulley nut. :eek:
Apparently theres a hole in the flywheel you can stick an M8 bolt in to lock the flywheel. Who knew? Bolt fitted in the flywheel and the nut came off with just a heave on a breaker bar. :)
With the pulley off i then struggled to get the seal out as access is pretty limited with the exhaust heat shield in place and coolant hoses everywhere.
The claw end of a hammer seems to do the job nicely though.
Automotive fuel system Motor vehicle Light Automotive tire Automotive exterior
Automotive tire Motor vehicle Automotive exterior Rim Automotive wheel system
Automotive tire Tire Tread Motor vehicle Wood
Automotive tire Motor vehicle Rim Gas Machine
 
#4 · (Edited)
The sump plug thread in the case is stripped. :(
A few coils of metal came out with the sump plug and some more came out when i stuffed a cloth wrapped screwdriver in there to dry the oil out to allow me to get a better look at the threads. Seems like its been helicoiled before as they were steel coils not aluminium from the case.

The original sump plug is only a short thing and a few people have suggested using a longer mercedes sump plug to hopefully catch more of the threads in the case.
I'm not sure this solution will work if its been helicoiled as surely it will have been tapped to a bigger size before the helicoil was fitted. :confused:

I removed the oil filter only to find a cracked rubber o ring on it. That'll explain some of the oil leakage.
Removing the tin under the pushrod tubes on the passengers side revealed it to be dry with no leakage. :)
Automotive tire Motor vehicle Automotive lighting Grille Automotive design
Automotive tire Camera accessory Rim Auto part Synthetic rubber
Gas Auto part Machine Font Automotive wheel system
Automotive lighting Automotive tire Grille Motor vehicle Hood
 
#5 ·
I gave both the pulley and the alternator bracket a clean up and a couple of coats of paint.
Did the same to the dipstick tube and its mounting bracket and hung them on my drying tree. :D
 

Attachments

#7 ·
I don't really know. I've never used one or even come across one before.
From looking at the youtube videos the hole is tapped to create a thread and then helicoil inserted. If it was M14 before then i assume a new m14 helicoil might possibly be able to be installed again if i can get the remains of the old one out. It seems to have broken up as theres about 1/2 a dozen coils in the oil drain pan.

I've attacked the seams a few times over the years but its usually from the backside of the panels that it comes from. Theres no way to get to a lot of them so other than cutting them out and recreating the two panel edges i'll always be fighting a loosing battle. They look good for a year maybe then it comes back through.
Halfords no longer sell the paint in aerosols so it'll just end up red oxided then painted with aldi metal paint for the time being.
 
#9 ·
Turns out the coils from the sump drain plug were the threads from the case. Looks like it'd been overtightened before. I didn't find a copper crush washer under the bolt head. I thought it might have just dropped in the oil drain pan but when i tipped it all into a container it wasn't in the bottom of the pan. :confused:
I'm gonna have to buy a M14 x 1.5 helicoil kit to do this one thread which is a bugger. Shame its not the same thread as a spark plug as that might come in useful at some point. Spark plugs are M14 x 1.25. :(

Removed the starter as it'll need removing when the gearbox is removed anyway. I might as well give it a clean up and some rust cure and a paint while its out.
It was rebuilt about 5 or 6 years ago and the casing was sand blasted and painted. Didn't stay nice very long.
Alternator isn't too bad so i'll just give the case a scrub and might paint the pulley. I tried to remove the nut holding the pulley on but i can't get it undone.
 

Attachments

#11 ·
Managed to get the pulley oil seal in place with a bit of struggle due to lack of access space.

Put the pulley on too but needed to tap it slightly to get it fully on. No space to swing a hammer but a length of 2x4 through the flap behind the number place worked. :)
 

Attachments

#12 ·
Got the dizzy back in, dipstick tube o ring fitted and bolted in, spark plugs gapped and installed, breather tower and fuel pump back in and the alternator and belt and carb top and filter fitted.
Just waiting for a couple of new stainless jubilee clips for the LPG hoses and i can say the engine bay is done.

Next on the list will be tapping the oil drain plug thread so a helicoil can be inserted and refitting the oil pressure relief spring with a new washer under the bolt.

Not looking forward to removing the gearbox on my own as my jack won't reach as the van is on ramps so i'll have to bench press the thing out from under the van with the engine supported from above. :(
 

Attachments

#13 ·
Decided to wire brush the starter, then put some Deox gel on and covered it in cling film for the night. Hopefully it'll come up ok and i can give it a coat of two of paint.

Removed the side cover off the sliding door side of the van to be greeted my rusty holes. :(
They're not all the way along so hopefully i can just cut back to good steel and weld some patches in.
I gave it a coat of deox gel and cling filmed it over night.

I also cut the section of the rear corner out around the seam so need to remake that and weld it in.
Seems the VW applied rubbery coating on the arches and seams has cracked and held walter against the back of the panels. There a bit at the back of the arch that seems to be just paint and rubber underseal. :rolleyes:
 

Attachments

#15 ·
Chopped some of the rot out of the side panel and a couple of little bits from the end of the arch and lower rear corner.
Wasn't really in the mood to go chopping stuff out so thats as far as i got.
 

Attachments

#17 ·
I managed to save enough of the flange at the lower corner to make one from sheet steel.
The rubberised sealant VW used at the factory has done a good job in places but its dried out, cracked and held water against the back of the seams and rotted them from behind. :(
 
#19 ·
Same to you. :)

I'm trying to keep myself as busy as possible because otherwise my brain has a chance to think about whats going on in the world and it starts freaking me out.
Atleast the weather is being kind at the moment. Last thing i need is SAD also bringing me down.
 
#20 ·
Gave the starter a coat of black gloss. Just to keep the rust at bay rather than to make it look pretty.

Demolished the old rotten shed in the garden. I had a minutes silence for the fallen hero. That hammer was older than me. :(
I'd obviously forgotten i've gained superhuman strength. :incheek:

Nothing better than a nice pint of homebrew dark fruits cider over ice when the weather is nice and sunny. Other than remembering it only cost 38p a pint to make. :D
 

Attachments

#21 ·
I bought a cheap M14 x 1.5 helicoil kit for the sump plug thread. Only problem i can see is the drill bit a reduced shank where it fits in a drills chuck so i'm not sure it will fit my drill. :rolleyes:

I don't really want to have to spend another £8 or £9 on a drill i'm only likely to use once or twice.

I unmasked the starter motor as its had 24 hours to dry. Its not going to be seen once fitted but its nice to know theres now a few coats of gloss enamel on it.
 

Attachments

#22 · (Edited)
Investigated the rust volcano in the floor behind the passengers seat. Seems like some mud or sand had got on top of the outrigger but under the floor and just ate its way out. :rolleyes:
A mini sand blaster or spot blaster would come in so useful.
Water Liquid Light Azure Wood
 
#23 ·
Trimmed a couple of bits of beetle door to size to use as repair patches. Always nice to reuse vw steel.

Opened the sliding door and it made a grinding noise and one of the middle bearings fell apart spilling ball bearings onto the floor. Yet another thing to add to the list of stuff to buy.

I haven't attempted to tap the sump thread into the case ready for a helicoil to be inserted. My tap set doesn't have a T handle that will fit the M14 x 1.5 tap in the helicoil kit so i need to devise another way of working it.
 
#24 ·
Found out the bearings for the sliding door middle track are the exact size 608z bearing as skateboard wheels (and fidget spinners) and are available online as Stainless or Titanium sealed bearings for a 1/4 of the price of buying from a VW specialist. I can even choose the seal colour to if i so desire. :)
 
#25 ·
I've been a bit lax taking piccies but today i managed to get all the bits cut to size to repair the holes in the floor above the jacking point outrigger.
Theres 3 layers in total as the battery box under the seat has a fold on the bottom that sits on the outrigger with the van floor sitting on top of that.
Luckily the hole isn't 6" further inboard as it'd be on top of the fuel tank then. :eek: I'll cover tank with a board anyway so no stray sparks can get to it.

I've used a jack underneath to hold a piece of copper under the hole so theres something for the steel to sit on while i weld it into place as its too small to hold with a magnet and you can't get clamps on.
 
Top